


Four steps to accelerate video content: a guide to Video Transcoding and Adaptive Streaming
Videos are the next big thing for engaging with your users. According to our friends at Techsmith (we love Camtasia 💚), 48% of people find video the most engaging form of communication and videos can improve conversion by 80%.
Everyone has experienced adaptive bitrate streaming when watching Youtube videos. The quality of the video rendered by the Youtube video player adapts to your Internet connection speed to prevent annoying buffering and deliver the best possible viewing experience, regardless of your device or connection speed and stability.
Offering your users the same video experience on your website, e-commerce, or mobile app is simple: upload your videos to Youtube and embed their great video player. Job DONE.
But WAIT, what if:
1. you are not willing to upload all your video content to Youtube and/or,
2. you do not want to have the Youtube logo shown on your website
The easiest solution is to host your video content in your backend and deliver it over the built-in HTML5 video tag. It is the fastest way to get videos playing on your applications. However, there are few shortcomings to this approach as well:
1. a short Full HD video (1080p) can easily weigh a few 100s of MBs. For example, my favorite "From the Air" HD 44s video is 114 MB in HD and will for sure buffer on slower connections using that approach,
2. fast-forwarding or rewinding is also a pain when using the video tag,
3. the same file will be delivered on Desktop on Mobile, while you might not need HD to deliver an acceptable quality on Mobile,
4. setting up your CDN to deliver videos comes with a bunch of challenges around segmented caching and range-requests to the origin.
Check by yourself the potential result below, unless you have a great connection, it will lag:
The solution
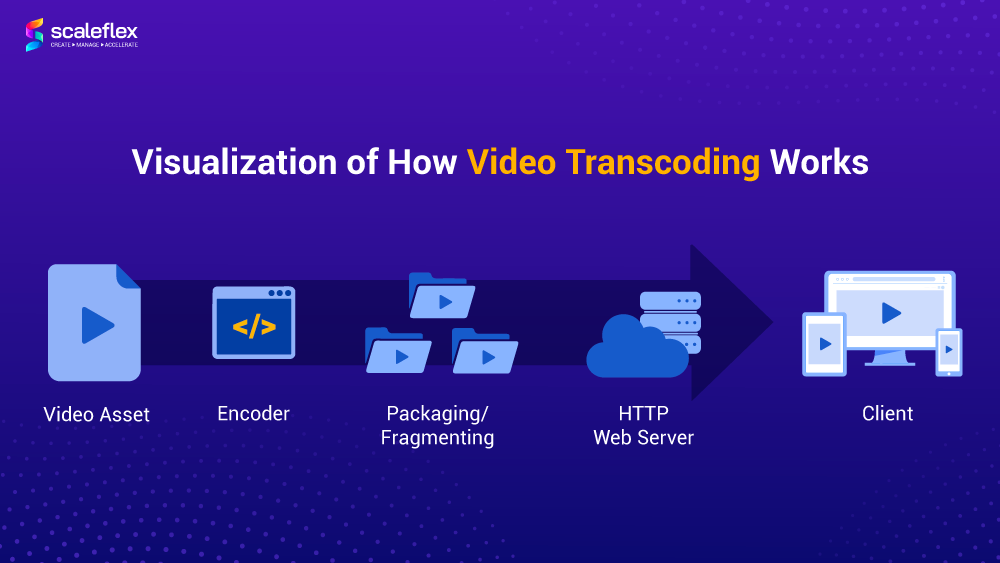
This is where Adaptive Bitrate Streaming (ABS) and Video Transcoding become your two new best friends.
Adaptive streaming is also known as adaptive bitrate streaming because the term "bitrate" is frequently used to describe the speed of an internet connection. The bitrate of a fast internet connection is higher than that of a sluggish internet connection.
ABS technology allows a video player to select which video resolution suits your visitor's device and Internet connection best. DASH and Apple HLS are the two main Adaptive Bitrate Streaming protocols used on the web. As indicated by its name, Adaptive means that multiple video resolutions are required server-side for the video player to choose the most "adapted" one to the current client connection. This is where Adaptive Transcoding for Videos comes into play.
Video Transcoding allows the generation of multiple video resolutions from an original high-resolution video file (HD or 4k). Like images that must be resized to fit the image container size on desktop and mobile to load fast (see Responsive Images: Fundamentals and Implementation Methods), videos must be transcoded in various lower resolutions in order for video players to have multiple options to choose from for Adaptive Bitrate Streaming.
Why does Adaptive Streaming and Video Transcoding matter?
According to a study by Professor Ramesh K. Sitarman of the University of Massachusetts, a mere 2 second delay will cause users to start abandoning your videos, with 6% of viewers leaving after every additional second. And users with higher internet speeds have even higher intolerance of slow videos and delays.
When there are so many different screen sizes, internet speeds, and locations where users view the same video, adaptive transcoding is not just a good-to-have, but a must-have. Users increasingly now expect it. Adaptive Streaming and Video Transcoding technologies allows you to deliver high-quality videos to your users with higher bandwidth and fast internet speeds while accommodating those in other locations with slower speeds; solving two main problems - Quality and Buffering.
For example, as most videos play at 24 frames for each second, the internet connection will need to download minimally 24 frames for each second to avoid buffering. With slow internet connections, instead of a freezed screen waiting to buffer, an adaptive video can adapt to the different signal strengths and deliver a smaller, and lower quality video file.
The benefit? There’ll be no more buffering and streaming interruptions! And when a user’s signal strength improves, the stream will dynamically adapt to deliver a high-quality video.
Today, when videos are increasingly popular for all businesses online - whether to engage audiences, advertise their products, or provide bite-size information, adaptive transcoding technologies are vital! Fast images, fast videos, fast sites are a must for businesses in the online space!
Video Transcoding and Adaptive Streaming with Filerobot DAM
In this guide, I will share my experience gained while building the Adaptive Streaming solution leveraged by our Digital Asset Management solution Filerobot.
Before I start, here are a few prerequisites to prepare if you want to build your own media server for Video Transcoding and deliver videos over Adaptive Streaming:
1. Origin videos at least with HD resolution (1080p) (codec h264 | formats: mov, mp4, m4a, 3gp, 3g2, mj2)
2. A powerful, ideally GPU-based, server to transcode your video content
3. A scalable storage solution to host your origin and transcoded video files (I have found out that Object Storage like Amazon S3, Azure Blob or Google Cloud Storage work well for this use case)
4. A Content Delivery Network (CDN) to cache your video chunks as close to your users as possible and accelerate loading times
5. A video player supporting Adaptive Streaming protocols like DASH and HLS: I have worked extensively with VideoJS, which is Open Source and can be customized easily. It offers nice testing pages for HLS and DASH. Feel free to research other alternatives, there are also some great commercial players
6. Some coding skills in distributed and multi-processing software in order to build a performant solution 🚀
HLS and DASH are the main formats used for delivering adaptive bitrate streaming video. HLS is older and broadly supported. However, it shows no likelihood of becoming an official standard format for now. I would give it a slight advantage on HLS over MPEG-DASH in terms of native support of HTML5 and players.
This is how the same video from above is delivered over Adaptive Streaming with HLS through VideoJS. If your connection is not great, the player will stream lower resolution 2-seconds video chunk and re-evaluate the quality of your connection to adapt accordingly:
Step 1: transcode video on GPU-powered servers
GPU servers are a must-have for faster processing of the videos. Usually, you can make almost everything on CPU, but having a GPU server speeds up transcoding by and average of 5 times, according to my tests. You can find some instances in AWS, Azure, or other Cloud providers. The current situation with cryptocurrencies and the machine learning boom results in very high costs for most GPU-powered machines. If I had to provide a recommended video card, it would be NVIDIA® Tesla® V100 Tensor Core (affordable costs/performance balance). Check out the installation settings on Ubuntu LTS.
FFpmeg does the transcoding part. It is the leading multimedia framework that decodes, encodes, transcodes, mux, demux, stream, filter, and you will need it if you want to deal with video processing. It can be installed in a single command, which can depend on your system, but if you're going to become a video transcoding pro, you will need to compile it with suitable options for your OS and processor. Check the compilation guide here.
A sample FFmpeg command:
ffmpeg -i ${source} \
-pix_fmt yuv420p \
-c:v libx264 \
-b:v 600k -minrate:v 600k -maxrate:v 600k -bufsize:v 600k \
-profile:v baseline -level 3.0 \
-x264opts scenecut=0:keyint=75:min-keyint=75 \
-hls_time 3 \
-hls_playlist_type vod \
-r 25 \
-vf scale=640:-2 \
-an \
-hls_segment_filename ../${base_name}/360p/360p_%06d.ts ../${base_name}/360p/360p.m3u8
You will usually end up with a longer and more complex command.
In the command above, I am generating different video chunks and the playlist / manifest file required for the video player to air the video and comes as .m3u8 for HLS or *.mpd for DASH.
Executing the sample FFmpeg command on a GPU server will not function. You need to append it with suitable options and set up hardware acceleration. Some of the most common flags are -L/usr/local/cuda/lib64 -L/usr/local/cuda/lib32/ I found useful information about hardware acceleration here.
Step 2: upload playlist / manifest and video chunks to storage
Once the playlist / manifest and the chunks are generated using FFmpeg, you need to upload them in your storage solution of choice. It is crucial to find a solution providing good upload bandwidth. Keep in mind that you will have separate variants of the same video, so storage should be big enough to keep the video's size x 5 (or even 10), which is also affected by resolution and bitrate.
It is also important to implement parallel uploading in order to upload the chunks of a given resolution as soon as they are transcoded.
If usual suspects in Cloud storage provide nice SDKs to simplify this part, I have linked some of the Python SDKs I used below:
Step 3: deliver video chunks over CDN
Once your video is transcoded and the playlist / manifest + all chunks are uploaded into your storage, the next step is to set up your CDN for video streaming. Using a CDN is crucial if you want to deliver your video chunks as fast as possible anywhere around the world as downloading directly from the storage is usually too slow for video streaming. Popular CDN providers I am familiar with are :
Setting up a CDN for video streaming is tricky but involves following steps:
1. Create a custom CNAME to deliver your playlist / manifest and chunks over your own subdomain (important for SEO)
2. Set up a SSL certificate and deploy it on all CDN nodes
3. Configure the CDN distribution to connect to your storage as origin
Configure caching to not cache the playlist / manifest files (.m3u8, .mpd) but cache the video chunks (.ts, .$ext$)
4. Get familiar with invalidation / flush in order to updated expired video chunks on the CDN nodes
5. Ah yeah forgot, get a contract with good pricing, nothing comes for free 😃
Step 4: play your video chunks with an Adaptive Streaming-capable video player
Finally, you are ready to play your transcoded video on your web or mobile application. To achieve this, you need to use a video player supporting HLS or DASH, some are free, some are not:
- Video.JS 7 (Open-Source and Recommended)
- MediaElement.js
- Plyr
- DPlayer
Once you have selected your player and embedded it in your web application, you simply need to reference your video by the link to the playlist / manifest file via the CDN link.
Note: it is important that the host and path to the playlist / manifest file is the same as the one to your video chunks. I have not been able to figure out a way to host the playlist / manifest file in a separate folder or storage other than the video chunks.
In my example, I am uploading my playlist / manifest and video chunks to our DAM solution Filerobot and access the former via:
https://token.filerobot.com/video-name/dash/video.mpd

https://token.filerobot.com/video-name/hls/video.m3u8
To monitor the loading of each video chunk, you can use the Network tab your favorite's browser inspector or developer tools:
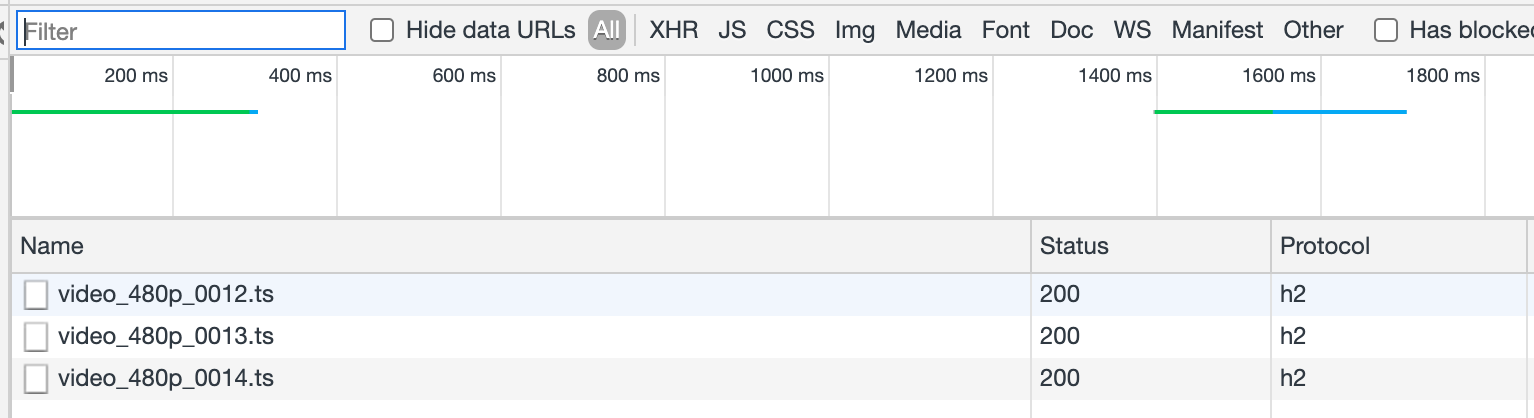
Feel free to throttle your connection speed (under the Network tab in Chrome) to see how the video player start downloading chunks of lower resolution:
You're DONE!
Return to the Table of ContentsConclusion
In this post, I have summarised at a semi-high level how to build an Adaptive Bitrate Streaming solution for delivering fast videos to users online and offer the "Youtube-experience".
Even though the overall concepts are simple, there are many topics to dig into deeply before being able to put together a robust and scalable solution: FFmpeg, GPU, Storage, CDN, video players, ... If you want me to write dedicated posts on any of the steps or technologies used above, let me know in the comment section below!
Feel free to try building your own media server for Adaptive Streaming out and share your feedback below, happy to learn from your experience. If you are looking for a quick solution to get started, check out our Digital Asset Management solution Filerobot.
We have built-in Video Transcoding capabilities and a scalable multi-CDN architecture to take care of your videos for you 📹 🚀.

