


JPEG compression at the service of your site speed, SEO, and increased conversion
How to leverage JPEG compression to reduce your image weight, speed up your website and increase your SERP rank.
In our first article about image optimisation, we gave 5 hints on how to boost the images on your website and mobile app in order to make your website or mobile app load faster.
In this article I will detail the 2nd takeaway from it:
Takeaway 2: leverage JPEG compression to reduce the size in MB of your image. q=85 is a good default value to optimise images without visible quality loss.
Once you have generated multiple image sizes to supply the right image size at the right moment of your user’s journey, you can further reduce the file sizes of your images by compressing the image using JPEG compression methods and reduce its file size.
Lossy vs lossless image compression
Before we dig into image compression, we need to understand what lossy and lossless image compression methods are.
A lossless compression method allows to compress and image to obtain a smaller file, while keeping the option to come back to the origin image.
If we translate this to files, then the zip format is a lossless compression method.
It allows you to compress a file (or a set of files) by zipping it (them) and get back to the original(s) by unzipping. The most common image format supporting lossless compression is PNG.
PNG is great for vector graphics, line art, logos, pictures involving transparency or when you are in the process of editing images.
Also, PNG is great when there are few colors in the image.
Keep in mind that PNG images are usually larger in file size than other formats and should not be abused.
The alternative to lossless compression is obviously… lossy compression 😃.
Lossy compression is irreversible and and images saved with lossy compression cannot be retrieved in the original quality. The most common method for lossy compression is JPEG.
JPEG is great for photos, large images and realistic images.
It is the preferred format for images on the Web as it is much smaller than BMP and has a wider range of use cases than PNG.
There is one last format still widely used: GIF. GIF is lossless and support up to 256 colours. It is adapted for small animation but not recommended for images as files are of larger file size than other formats.
We will focus on PNG and JPEG in the reminder of this article.
PNG or JPEG?
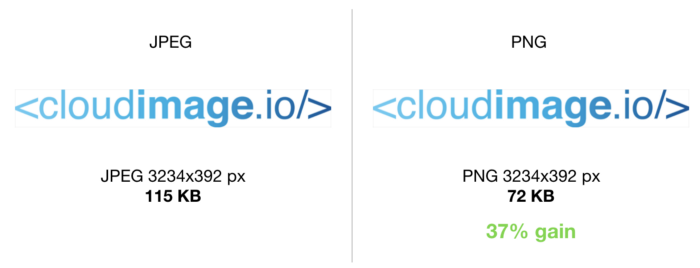
As a rule of thumb, the recommendation is to save logos, picture requiring transparency (alpha channel) and images with few colours as PNG. The resulting image will be smaller than JPEG.
For example:
If you consider an photo, then JPEG will perform usually better than PNG and output a significantly smaller file size, without any visible quality loss:
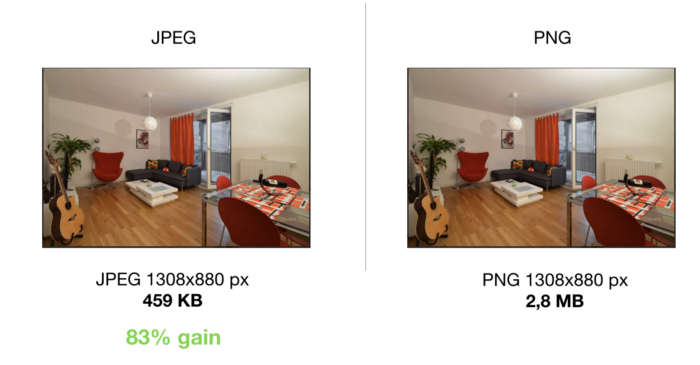
Again, this is a rule of thumb and you will always find exceptions where PNG will be better for a specific photograph than JPEG in terms of output file size, but we can safely say:
PNG is more optimised for logos, line art, pictures with transparency and images with few colours.
JPEG is more optimised for everything else 😅
Compression parameters
Lossy image formats like JPEG allow to compress an image to reduce its file size, at the cost of quality.
There are multiple parameters to take into account when compressing a JPEG image, but we will focus on one specific today: the JPEG quality index q. q ranges from 1 (lowest quality, highest compression => lowest file size) to 100 (highest quality, lowest compression => higher file size).
A balance must be found between compression and quality for the user to enjoy fast loading AND beautiful images at the same time.
At Cloudimage, our year-long benchmarking found out that there is no formal specification for the quality index q available with the various JPEG encoders like ImageMagick, GD, image_optim.
Hence every encoder does its own little “magic”, but the bottom line is simple and similar across all encoders: combine a 8 by 8 pixel square into 2 by 2 pixel square and decide which colour to give to the “downsampled” square.
JPEG encoders all play with the JPEG downsampling ratio (details on Wikipedia) and the colour interpolation algorithm used in order to decide which colour should have the resulting “downsampled” pixels.
Unfortunately, there is no “magic” value for q, every image is different.
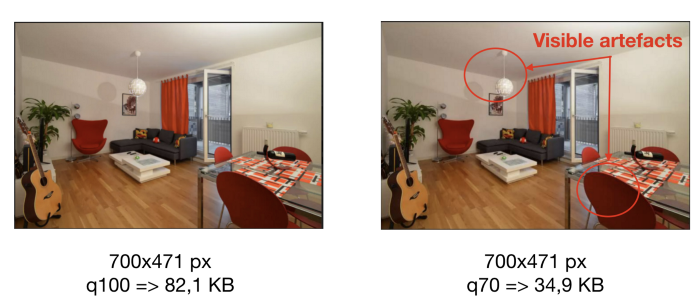
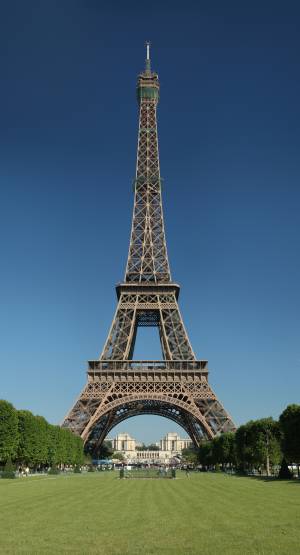
As you can see on the examples below, the our Eiffel Tower can be have its file size reduced by 4 without visible quality loss, while our flat does not even reach a gain of 2 before visible artefacts appear.
The following examples are compressed with the GD image library.
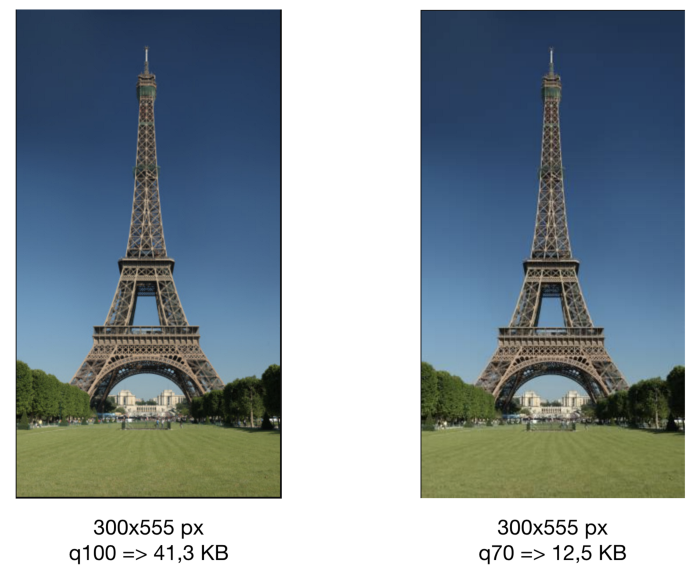
Full size images: https://demo.cloudimg.io/width/300/q100/sample.li/eiffel.jpg
https://demo.cloudimg.io/width/300/q70/sample.li/eiffel.jpg
Full size images to see artefacts:
https://demo.cloudimg.io/width/700/q100/sample.li/flat.jpg
https://demo.cloudimg.io/width/700/q70/sample.li/flat.jpg
How to find the best quality index for my image?
There are 2 strategies you can adopt:
- You are conservative with JPEG compression and use a high value of q.
Our experience shows that any value above q > 85 should give reasonably well compressed images with no visible quality degradation. - You adapt q based on your image.
We will discuss in another article what methods are available to programmatically define the best q for a given image, it’s not easy.
If you use Cloudimage as image resizing and delivery service, then you can benefit from both strategies.
If you go for the first strategy, simply set q=85 in the filter part of your Cloudimage URL and Cloudimage will automatically compress your images to q=85.
https://demo.cloudimg.io/width/700/q85/sample.li/boat.jpg
If you want to really optimise the file size of your image and are ready to take some little risks, then you can use Cloudimage’s Optipress algorithm, to automatically calculate the optimal compression parameters and quality index for your image.
Optipress will be subject to a longer article soon, where we will explain how thanks to machine learning we were able to train Optipress to get better and better at finding the best compression parameters for a given image.
For now, simply use optipress as filter in your Cloudimage URL to get started:
https://demo.cloudimg.io/width/700/optipress/sample.li/boat.jpg
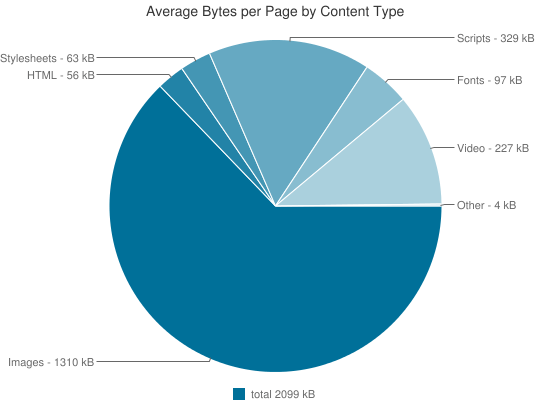
Images represent 62% of your page loading time
In this article, we focused on the 2nd takeaway from our intro article on how to prevent slow images to bounce your customers.
If you consider that images represent about 2/3 of your page loading time, then putting your images on a diet to accelerate their loading time becomes a must.
Make sure to subscribe to our newsletter below for monthly updates, news and case studies sent straight to your inbox! Be the first to know!

